Skip links

Sonarqube on EKS: Installation Guide

Jump To Section

How to install and configure sonarqube

Currently, Sonarqube is not supported on EKS. There is documentation around how to install it on Docker, however no clear documentation around setting up the cluster on ECS or EKS. So, here you learn how to install Sonarqube?

We will try to implement the below architecture where we will create an EKS cluster using the eksctl command and use EFS as persistent storage for data generated from the Sonarqube application.

The article doesn’t take into consideration of security practices. This document is purely for reference purposes.
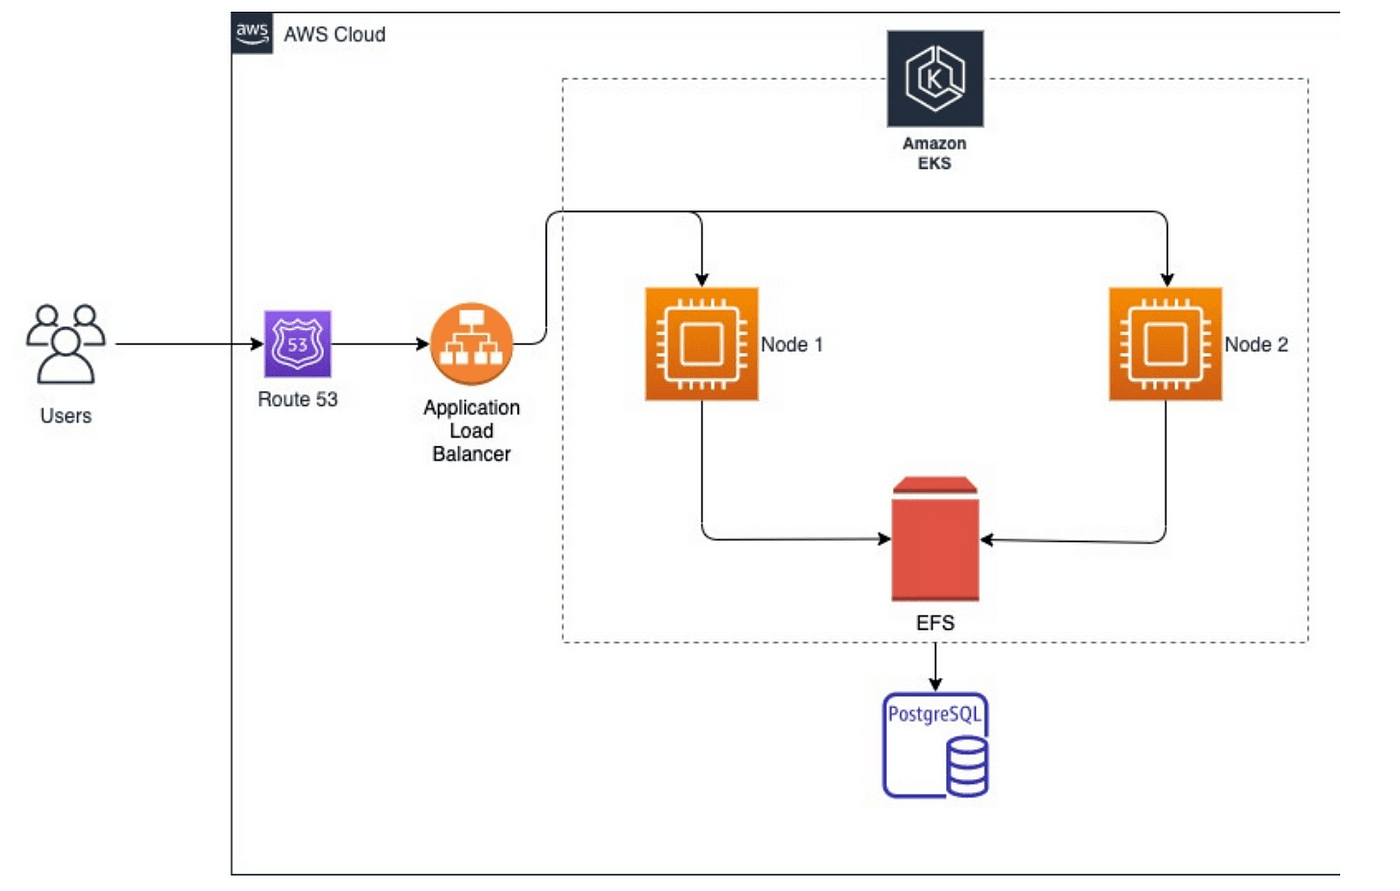
How to install and configure sonarqube

Create an IAM User with Admin Permissions

  • Navigate to IAM > Users.
  • Click Add user.
  • Set the following values: User name: k8-admin, Access type: Programmatic access
  • Click Next: Permissions.
  • Select Attach existing policies directly.
  • Select AdministratorAccess.
  • Click Next: Tags > Next: Review.
  • Click Create user.
  • Copy the access key ID and secret access key, and paste them into a text file, as we’ll need them in the next step.

Also read: Latest DevSecOps Trends

Launch an EC2 Instance and Configure the Command Line Tools

  • Navigate to EC2 > Instances.
  • Click Launch Instance.
  • On the AMI page, select the Amazon Linux 2 AMI.
  • Leave t2.micro selected, and click Next: Configure Instance Details.
  • On the Configure Instance Details page:
    Network: Leave default
    Subnet: Leave default
    Auto-assign Public IP: Enable
  • Click Next: Add Storage > Next: Add Tags > Next: Configure Security Group.
    Click Review and Launch, and then Launch.
  • In the key pair dialog, select Create a new key pair.
  • Give it a Key pair name
  • Click Download Key Pair, and then Launch Instances.
  • Click View Instances, and give it a few minutes to enter the running state.
  • Once the instance is fully created, check the checkbox next to it and click Connect at the top of the window.
  • In the Connect to your instance dialog, select EC2 Instance Connect (browser-based SSH connection).
  • Click Connect.
  • In the command line window, check the AWS CLI version:
    aws --version It should be an older version.
  • Download v2:
curl "https://awscli.amazonaws.com/awscli-exe-linux-x86_64.zip" -o "awscliv2.zip"
  • Unzip the file:
unzip awscliv2.zip
  • See where the current AWS CLI is installed:
which aws
  • It should be /usr/bin/aws
  • Update it:
sudo ./aws/install --bin-dir /usr/bin --install-dir /usr/bin/aws-cli --update
  • Check the version of AWS CLI:
aws --version

It should now be updated.

  • Configure the CLI:
aws configure
  • For AWS Access Key ID, paste in the access key ID you copied earlier.
  • For AWS Secret Access Key, paste in the secret access key you copied earlier.
  • For the Default region name, enter us-west-2
  • For Default output format, enter json.
  • Download kubectl:
curl -o kubectl https://amazon-eks.s3.us-west-2.amazonaws.com/1.16.8/2020-04-16/bin/linux/amd64/kubectl
  • Apply execute permissions to the binary:
chmod +x ./kubectl
  • Copy the binary to a directory in your path:
mkdir -p $HOME/bin && cp ./kubectl $HOME/bin/kubectl && export PATH=$PATH:$HOME/bin
  • Ensure kubectl is installed:
kubectl version --short --client
  • Download eksctl:
curl --silent --location “https://github.com/weaveworks/eksctl/releases/latest/download/eksctl_$(uname -s)_amd64.tar.gz” | tar xz -C /tmp
  • Move the extracted binary to /usr/bin:
sudo mv /tmp/eksctl /usr/bin
  • Get the version of eksctl:
eksctl version
  • See the options with eksctl:
eksctl help

Provision an EKS Cluster

  • Provision an EKS cluster with two worker nodes in us-west-2:
eksctl create cluster --name sonarqube --version 1.21 --region us-west-2 --nodegroup-name sonarqube-workers --node-type t3.medium — nodes 2 --nodes-min 2 --nodes-max 3 --node-volume-size 30 --ssh-access --managed
  • Update kubeconfig on bastion node
aws eks update-kubeconfig --name sonarqube --region us-west-2
  • Run kubectl command to check nodes
kubectl get nodes

Provision EFS

Ref: https://docs.aws.amazon.com/eks/latest/userguide/efs-csi.html

Create Postgres instance in EKS using helm

Ref: https://dev.to/arctype/deploy-and-manage-postgresql-on-kubernetes-oni

Create a new database for Sonarqube

postgres=# \l
List of databases
Name | Owner | Encoding | Collate | Ctype | Access privileges
-----------+----------+----------+-------------+------------- +-----------------------
postgres | postgres | UTF8 | en_US.UTF-8 | en_US.UTF-8 | template0 | postgres | UTF8 | en_US.UTF-8 | en_US.UTF-8 | =c /postgres + postgres=CTc/postgres template1 | postgres | UTF8 | en_US.UTF-8 | en_US.UTF-8 | =c /postgres +
postgres=CTc/postgres (3 rows) postgres=# CREATE DATABASE sonar;
CREATE DATABASE postgres=# \l
List of databases
Name | Owner | Encoding | Collate | Ctype | Access privileges
-----------+----------+----------+-------------+------------- +-----------------------
postgres | postgres | UTF8 | en_US.UTF-8 | en_US.UTF-8 | sonar | postgres | UTF8 | en_US.UTF-8 | en_US.UTF-8 | template0 | postgres | UTF8 | en_US.UTF-8 | en_US.UTF-8 | =c /postgres +
postgres=CTc/postgres template1 | postgres | UTF8 | en_US.UTF-8 | en_US.UTF-8 | =c /postgres +
postgres=CTc/postgres (4 rows)

Create a Secret to store PostgreSQL password

Kubernetes has a built-in capability to store secrets. To create a secret you need to base64 encode a secret value

echo -n '' | base64
bWVkaXVtcG9zdGdyZXM=

and create a k8s secret using YAML file

apiVersion: v1
kind: Secret
metadata:
name: postgres
type: Opaque
data:
password: bWVkaXVtcG9zdGdyZXM=

Apply the secret file

kubectl apply -f db_password.yml

Create a SonarQube deployment

After creating PVCs and Postgres secret we are ready to deploy using the following YAML file

apiVersion: apps/v1
kind: Deployment
metadata:
  labels:
    app: sonarqube
    name: sonarqube
spec:
  replicas: 1
  selector:
    matchLabels:
      app: sonarqube
  template:
    metadata:
      labels:
        app: sonarqube
    spec:
      containers:
        - name: sonarqube
          image: sonarqube:8.9.2-community
          resources:
            requests:
              cpu: 500m
              memory: 1024Mi
            limits:
              cpu: 2000m
              memory: 2048Mi
            volumeMounts:
            - mountPath: "/opt/sonarqube/data/"
              name: sonar-data
            - mountPath: "/opt/sonarqube/extensions/"
              name: sonar-data
            env:
              - name: "SONARQUBE_JDBC_USERNAME"
                value: "postgres"
              - name: "SONARQUBE_JDBC_URL"
                value: "jdbc:postgresql://postgresql-dev/sonar"
              - name: "SONARQUBE_JDBC_PASSWORD"
                valueFrom:  
                  secretKeyRef:  
                    name: postgres  
                    key: password
              ports:
              - containerPort: 9000
                protocol: TCP
      volumes:
        - name: sonar-data
          persistentVolumeClaim:
            claimName: efs-claim

Apply the deployment file

kubectl apply sonarqube-deployment.yml

Publish SonarQube via Kubernetes Service

After SonarQube is up and running we need to create a public endpoint to access our service

apiVersion: v1
kind: Service
metadata:
labels:
app: sonarqube
name: sonarqube
spec:
ports:
- name: sonar
port: 80
protocol: TCP
targetPort: 9000
selector:
app: sonarqube
type: LoadBalancer
$ kubectl apply -f sonar-svc.yaml
service/sonarqube created
$ kubectl get svc

Now we can hit EXTERNAL-IP address and login to SonarQube

Limitations

  • Only one replica set can be run for Sonarqube LTS or community edition.
  • Multiple replica set is only available on Data-center edition
Picture of Debjyoti Sarkar

Debjyoti Sarkar

Subscribe

Suggested Reading

Ready to Unlock Your Enterprise's Full Potential?